
Washing Machine Water Inlet Valve Replacement – What Fixes a Machine That Won't Fill or Leaks?
Need the replacement part? Search your model number at for guaranteed fit and fast free shipping.
Understanding the Problem
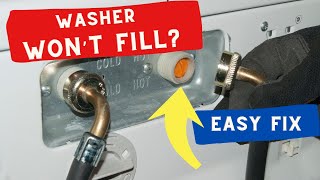
The water inlet valve (sometimes called the fill valve) controls water flow into the washer. When it fails the washer may not fill, may fill slowly, may never stop filling, or water may leak from the back. Follow these steps to diagnose and replace the inlet valve. 1) Initial checks and preparation: a. Unplug the washer and shut off both hot and cold water supply valves at the wall. Turn off water to prevent flooding. b. Pull the washer away from the wall enough to access the rear panel and water hoses. Place towels or a shallow pan under hoses to catch drips. 2) Visual inspection: a. Inspect the water supply hoses and hose washers for cracks or deterioration. Replace hoses if damaged. b. Look for water pooling at the inlet valve area, cracked plastic, or damaged inlet ports. c. Remove the inlet hoses from the valve (loosen wrench) and check the small inlet screens/filters inside the valve for debris or mineral buildup. Clean screens if clogged. 3) Functional checks (without disassembly): a. With the washer still unplugged, turn the water on and observe whether water flows through the hoses freely when disconnected. This confirms household water supply is OK. b. Reconnect hoses. Plug the washer in, select a fill cycle, and listen at the back of the machine near the inlet valve for a clicking or buzzing when the cycle calls for water. No sound can indicate a dead solenoid. 4) Electrical tests (requires a multimeter): a. Remove power. Remove the top or back panel to access the inlet valve wiring. b. Disconnect the inlet valve connectors. Set your multimeter to ohms and check continuity across each solenoid coil (typically two circuits: hot and cold). A healthy solenoid commonly measures between 500–1500 ohms (varies by model). An open circuit (OL) indicates a failed solenoid. c. Also inspect wiring and connectors for burn marks or corrosion. 5) Confirming the valve is the problem: a. If screens are clean and household water pressure is normal, but the solenoid(s) have no continuity or the valve does not click when energized, the valve is faulty and should be replaced. b. If the valve leaks mechanically (water drips when washer is off), replacement is required. 6) Replacement steps: a. Tools needed: adjustable wrench, Phillips and flat screwdriver, needle-nose pliers, multimeter, replacement inlet valve assembly, Teflon tape if required. b. Turn off power and water to the washer and unplug it. Disconnect inlet hoses and place towels to catch water. c. Remove the washer's top or rear access panel (depending on model) to reach the inlet valve. Some front-loaders require removing the top; consult your model manual. d. Note or photograph the wiring and harness locations. Disconnect all electrical connectors from the inlet valve. e. Remove the screws or mounting clip holding the inlet valve and withdraw the valve from the housing. Some valves are held by a mounting bracket or plastic tabs. f. Transfer any rubber gaskets or screens from the old valve to the new valve if not included. Install new valve in reverse order. Tighten hose fittings by hand then snug with wrench—do not overtighten. g. Reconnect electrical connectors to the matching solenoids (match wire colors or use your photos). Reinstall panels. h. Turn on water supply and check for leaks. Plug in the washer and run a short fill cycle to verify proper operation. 7) Post-repair checks: a. Verify both hot and cold fill functions (if your model has both). Check for leaks around fittings and valve body. b. Monitor the first couple of cycles for any intermittent issues. Safety note: Always disconnect power before accessing electrical components. Turn off water at the shutoff valves to avoid flooding. If you’re uncomfortable with electrical testing or working inside the appliance, hire a qualified appliance technician.
Common Symptoms
Washer won’t fill, fills slowly, fills continuously/overfills, water leaking at back of machine, no clicking sound from the inlet when cycle starts, error codes related to fill issues.
Common Causes
- Failed solenoid coil (electrical failure) in the inlet valve
- Clogged inlet screens or mineral buildup restricting flow
- Cracked valve body or leaking seals/gaskets
Popular Parts That Fix This Problem
These are the most common replacement parts that fix this problem. When you're ready to order, click below to find the right part at ProsourceParts.com — just search by your appliance model number for a guaranteed fit.

Helpful Repair Tip
Confirm a bad valve by checking the solenoid coils with a multimeter for continuity (open = bad) and by listening for a click/buzz when the washer requests water. If screens are clean but no click and no continuity — replace the valve.
Frequently Asked Questions
Can I replace the inlet valve myself?
Yes — replacing a washer inlet valve is a common DIY repair if you’re comfortable turning off water, unplugging the machine, and working with basic hand tools. Follow safety steps: disconnect power, shut off water, photograph wiring before disconnecting, and double-check for leaks after installation. If you don’t have a multimeter or are unsure about electrical testing, consider hiring a technician.
How much does replacing an inlet valve cost?
Part cost usually ranges $30–$120 depending on brand and whether it's OEM or aftermarket. Labor (if hired) typically adds $75–$200 depending on local rates. Total DIY cost is usually under $150; professional service varies by region.
Related How-To Videos

Real DIY Repair Stories
Be the first to share your repair story!
Share Your Repair Story
Your experience helps other homeowners fix their appliances. Tell us how it went!
Can't Fix It Yourself? Find a Local Technician
It's perfectly okay to call a professional. Some repairs require specialized tools, deep teardowns, or dealing with complex systems that are better left to the pros.

Find the Right Part for Your Appliance
Don't guess — search your exact appliance model number at ProsourceParts.com to find the correct OEM compatible replacement part. They offer fast free shipping, guaranteed fit, and thousands of parts in stock.
Your Free Parts Videos
Whether your dishwasher won't drain, your dryer stopped heating, or your fridge isn't cold, we've created simple repair guides for the most common appliance problems homeowners face. Each guide explains what's going wrong, the most likely causes, and which replacement parts fix the issue. When you're ready to order, we link directly to ProsourceParts.com where you can search by model number and get the right part shipped fast.