
LTG6234DQ1 Dryer Tumbles but Won't Heat – What Part Fixes This Problem?
Need the replacement part? Search your model number at for guaranteed fit and fast free shipping.
Understanding the Problem
If your LG LTG6234DQ1 dryer tumbles normally but clothes are not drying, this is most often a heating problem — especially on gas models. The motor and drum operate correctly, so the issue is usually in the gas ignition or temperature-safety circuitry rather than the motor, belt, or drum mechanics. A failed thermal fuse, burned-out igniter, bad gas valve solenoids, blocked venting, or a faulty thermostat/thermistor are the usual suspects. A systematic diagnosis will save time and money. Start with the simplest checks (power and venting), then test the thermal fuse and ignition components with a multimeter and visual inspection. Many of these components are replaceable by a confident DIYer; others (gas valve coils or anything requiring gas-line work) are safer left to a qualified technician.
Common Symptoms
Drum tumbles and motor runs, but no heat; long dry times; occasional clicking or attempted ignition; sometimes a gas odor when starting; dryer may start and then shut off or run very cool.
Common Causes
- Blown thermal fuse or thermal cutoff (safety device that opens when overheating or vent blocked)
- Failed gas igniter or gas valve solenoid coils (igniter does not glow or gas valve doesn’t open)
- Restricted venting/airflow or failed cycling thermostat/thermistor causing burner not to engage
Popular Parts That Fix This Problem
These are the most common replacement parts that fix this problem. When you're ready to order, click below to find the right part at ProsourceParts.com — just search by your appliance model number for a guaranteed fit.

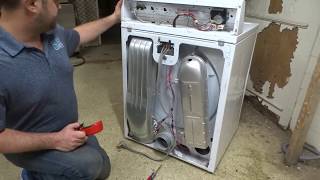
Helpful Repair Tip
First check the exhaust vent for blockage and confirm power to the dryer. Then remove the rear panel and test the thermal fuse for continuity with a multimeter — if the thermal fuse is open, replace it before testing ignition components.
Frequently Asked Questions
How do I tell if the thermal fuse is bad?
Unplug the dryer, access the thermal fuse (usually on the blower housing or exhaust path), remove it from the circuit and test for continuity with a multimeter. A good thermal fuse will show near-zero ohms; an open/no continuity reading means the fuse is blown and must be replaced. Note: thermal fuses blow most often when the venting is blocked or the dryer has overheated, so clear venting before reinstalling.
Can I safely replace the igniter or gas valve myself?
Replacing the igniter is a common DIY repair if you’re comfortable unplugging the dryer, removing panels, and using basic hand tools. Always disconnect electrical power and follow the service manual. Replacing gas valve solenoids involves working on gas components; while some experienced DIYers do this, any work involving gas connections is higher risk and many manufacturers or local codes recommend a qualified technician to avoid leaks and ensure safe operation.
Related How-To Videos

Real DIY Repair Stories
Be the first to share your repair story!
Share Your Repair Story
Your experience helps other homeowners fix their appliances. Tell us how it went!
Can't Fix It Yourself? Find a Local Technician
It's perfectly okay to call a professional. Some repairs require specialized tools, deep teardowns, or dealing with complex systems that are better left to the pros.

Find the Right Part for Your Appliance
Don't guess — search your exact appliance model number at ProsourceParts.com to find the correct OEM compatible replacement part. They offer fast free shipping, guaranteed fit, and thousands of parts in stock.
Your Free Parts Videos
Whether your dishwasher won't drain, your dryer stopped heating, or your fridge isn't cold, we've created simple repair guides for the most common appliance problems homeowners face. Each guide explains what's going wrong, the most likely causes, and which replacement parts fix the issue. When you're ready to order, we link directly to ProsourceParts.com where you can search by model number and get the right part shipped fast.