
Maytag Neptune Dryer Drum Seals – How to Diagnose and What Parts Fix This Problem
Need the replacement part? Search your model number at for guaranteed fit and fast free shipping.
Understanding the Problem
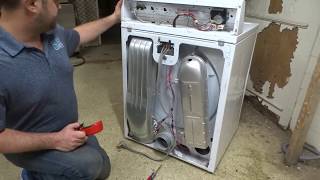
Maytag Neptune dryers use felt and rubber seals around the drum opening(s) to keep the drum centered and to stop fabric from rubbing on sharp edges. Over time the felt seals compress, shred, or detach and rubber seals harden or crack. When seals fail the drum can rub on the cabinet, drag on glides, create loud squeaks, allow lint and heat to escape, and reduce drying efficiency. If you hear a rubbing or grinding noise, find fabric scuffs at the drum edge, smell burning lint, or notice extended drying times and uneven drying, worn drum seals are a likely cause. Replacing the felt/rubber seals and any worn drum glides or rear bearing supports typically restores quiet operation and proper drum alignment. Because Maytag Neptune models vary, confirm the exact part fit for your model tag before ordering parts.
Common Symptoms
Squealing, rubbing, or grinding noises; visible shredded felt or torn rubber at the drum openings; fabric snags at the drum lip; burning lint smell; longer or uneven drying times.
Common Causes
- Normal wear: felt seals compress and disintegrate over years of use
- Heat and moisture damage: rubber seals harden, crack, or shrink
- Worn drum glides or rear bearing: lets the drum shift and rub against seals or cabinet
- Improper installation or foreign objects that gouge seals or drum edge
Popular Parts That Fix This Problem
These are the most common replacement parts that fix this problem. When you're ready to order, click below to find the right part at ProsourceParts.com — just search by your appliance model number for a guaranteed fit.

Helpful Repair Tip
Check for separated or shredded felt around the front and rear drum openings and spin the empty drum by hand—feel for rough spots or lateral play. If the drum touches the cabinet edge or glides, the seals or glides are worn.
Frequently Asked Questions
How do I confirm the drum seals are the problem?
Unplug the dryer, remove lint and venting, then rotate the empty drum by hand. Look and feel for shredded felt at the front or rear drum openings, rub your finger along the drum lip for rough spots, and listen for rubbing or squeaking. If the drum moves laterally (side-to-side play) or contacts the cabinet during rotation, seals and/or glides are likely worn. Inspect the glides and rear bearing for scoring—if they’re worn, replace them with the seals for a durable repair.
Can I just replace the seals myself or should I call a technician?
Replacing drum seals on a Maytag Neptune is a medium-difficulty task that many mechanically-inclined owners can do with basic tools and the dryer unplugged/disconnected from gas or power. It requires removing panels and the drum to access front and rear seals and may require removing the bulkhead on some models. If you’re not comfortable disassembling the cabinet, don’t have the right tools, or the dryer has extensive bearing damage, calling a professional is recommended to avoid further damage and ensure proper alignment.
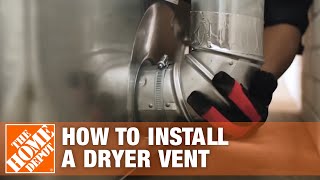
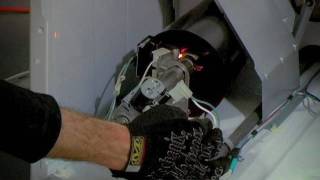
Related How-To Videos
Real DIY Repair Stories
Be the first to share your repair story!
Share Your Repair Story
Your experience helps other homeowners fix their appliances. Tell us how it went!
Can't Fix It Yourself? Find a Local Technician
It's perfectly okay to call a professional. Some repairs require specialized tools, deep teardowns, or dealing with complex systems that are better left to the pros.

Find the Right Part for Your Appliance
Don't guess — search your exact appliance model number at ProsourceParts.com to find the correct OEM compatible replacement part. They offer fast free shipping, guaranteed fit, and thousands of parts in stock.
Your Free Parts Videos
Whether your dishwasher won't drain, your dryer stopped heating, or your fridge isn't cold, we've created simple repair guides for the most common appliance problems homeowners face. Each guide explains what's going wrong, the most likely causes, and which replacement parts fix the issue. When you're ready to order, we link directly to ProsourceParts.com where you can search by model number and get the right part shipped fast.