
Dryer Belt Broke on Drum – What Part Fixes This Problem?
Need the replacement part? Search your model number at for guaranteed fit and fast free shipping.
Understanding the Problem
When a dryer belt breaks while the drum is turning it will usually stop the drum from rotating altogether. The belt is the loop that wraps around the drum and connects to the motor via the idler pulley; when it snaps the drum spins freely by hand but the motor can’t transfer torque to it. A broken belt is one of the most common reasons a dryer will hum or run but not tumble. A belt can fail from age, heat breakdown, rubbing on an edge, a seized drum roller/shaft, or an incorrectly seated idler pulley. Replacing the belt is usually a straightforward repair, but you should inspect related parts (idler/tensioner, rollers, glides, motor) because any of them can cause excess wear and cause the new belt to fail prematurely.
Common Symptoms
Dryer runs but drum doesn't turn, loud thumping or squealing, burning rubber smell, visible belt fragments or a loose belt hanging from the drum.
Common Causes
- Worn, cracked, or aged drive belt that snapped from normal wear
- Belt rubbed on a sharp edge or was misrouted and wore through
- Seized drum roller, idler pulley or motor that caused excessive belt tension and breakage
Popular Parts That Fix This Problem
These are the most common replacement parts that fix this problem. When you're ready to order, click below to find the right part at ProsourceParts.com — just search by your appliance model number for a guaranteed fit.

Helpful Repair Tip
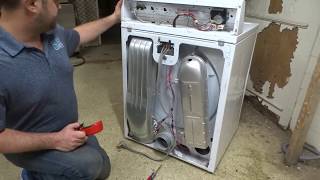
Open the dryer front or back panel (unplug first) and manually spin the drum. If the motor runs when you start the dryer but the drum does not turn and you can see belt fragments or a loose belt on the floor, the belt is the likely failure. Also check for belt dust and a snapped edge where the belt broke.
Frequently Asked Questions
How hard is it to replace a dryer belt myself?
Replacing a dryer belt is a medium-difficulty DIY job for someone comfortable with basic tools. Typical steps: unplug the dryer, remove the top/front panel (or rear panel on some models), release tension from the idler, remove the old belt, route the new belt around the drum and motor pulley, and reassemble. Most belt replacements take 30–90 minutes. Always check service manual or a reliable model-specific guide before starting.
How do I make sure I buy the correct replacement belt?
Use the dryer model number from the tag (usually inside the door or on the back panel) to look up parts. The correct belt must match the dryer's drum circumference, number of ribs (if ribbed), and material type. You can buy OEM belts or high-quality aftermarket belts — avoid guessing by length. If unsure, take the old belt to the parts store or use the model number when ordering online.
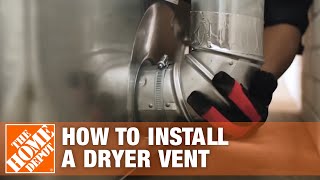
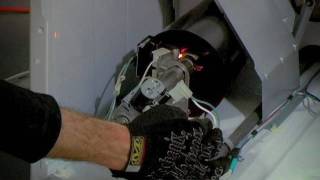
Related How-To Videos
Real DIY Repair Stories
Be the first to share your repair story!
Share Your Repair Story
Your experience helps other homeowners fix their appliances. Tell us how it went!
Can't Fix It Yourself? Find a Local Technician
It's perfectly okay to call a professional. Some repairs require specialized tools, deep teardowns, or dealing with complex systems that are better left to the pros.
Find the Right Part for Your Appliance
Don't guess — search your exact appliance model number at ProsourceParts.com to find the correct OEM compatible replacement part. They offer fast free shipping, guaranteed fit, and thousands of parts in stock.
Your Free Parts Videos
Whether your dishwasher won't drain, your dryer stopped heating, or your fridge isn't cold, we've created simple repair guides for the most common appliance problems homeowners face. Each guide explains what's going wrong, the most likely causes, and which replacement parts fix the issue. When you're ready to order, we link directly to ProsourceParts.com where you can search by model number and get the right part shipped fast.